
Scheme Manager Module
You can access the Scheme Manager module by clicking on the Services Button and clicking on ‘Channel Schemes Manager’ as shown below-
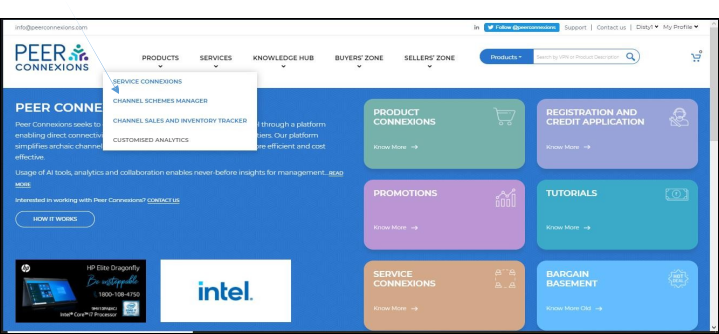
After clicking on the ‘Channel Schemes Manager’ option, you will be directed to the Scheme Manager Module as shown below-
Note: In order to use all features of the Scheme Manager module, one should have permission from the administrator to use this module.
There are four tabs within this module, each of which is explained below.
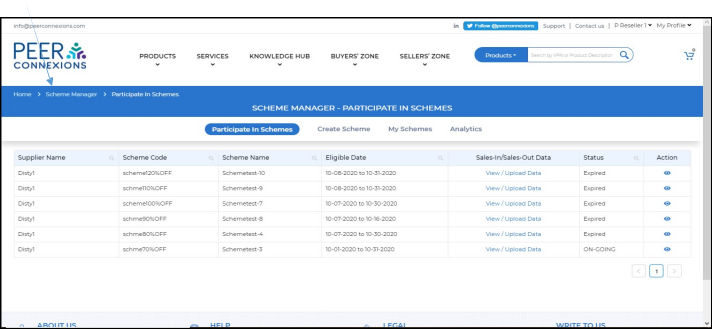
1. Participate In Schemes: –
In this section, the schemes offered by other users and in which you have already participated is listed. Here, you can view/upload the data for the required Scheme.
Note: Data cannot be uploaded for those schemes having status as ‘Expired’.
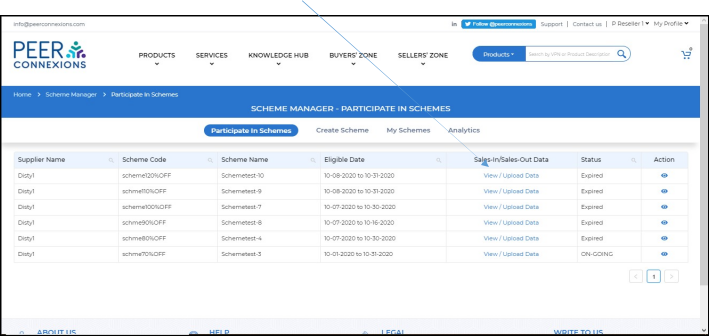
In order to View/Upload data, click on the ‘View/Upload Data’ button besides the required scheme
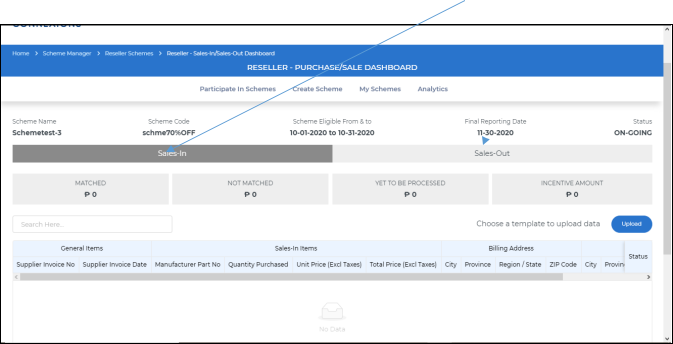
You will now be directed to a new page where you can select the template as ‘Sales-In’ or ‘Sales-Out’ for which you want to upload the data as shown below: –
Once you select the template (Sales In or Sales Out) and click on upload, you will be directed to a new page as shown below:-
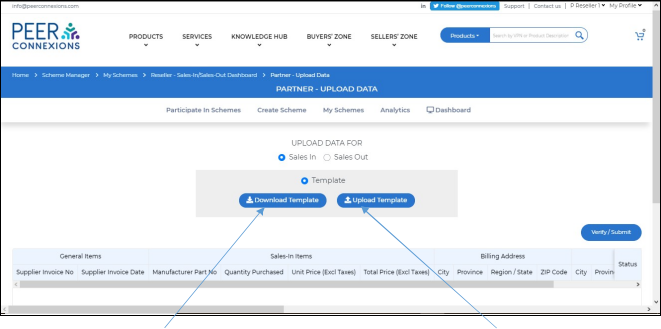
Now you can click on Download Template, fill in the required details and click on Upload template option. Below is a sample of the downloadable template.
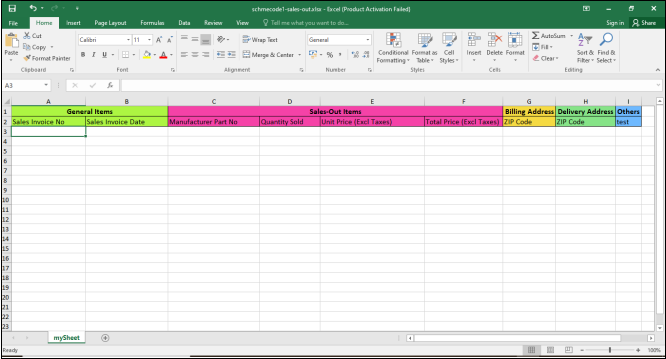
You need to fill-in all the details as per above template and they should be valid under the criteria set by the scheme manager.
After you upload the template, all the valid data will be successfully uploaded. Invalid data would not get uploaded and the page will be updated as shown below:-
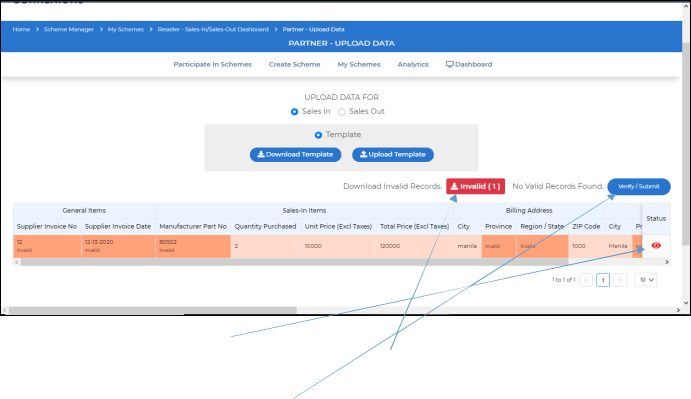
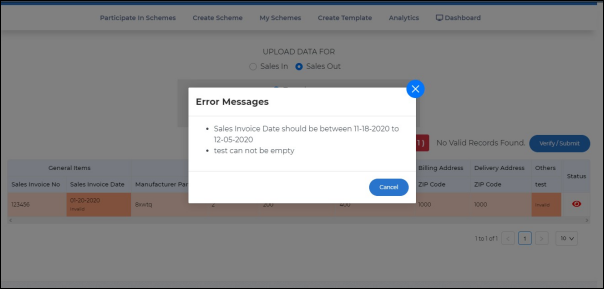
In this section, you can click on the Status (Eye symbol) button to see error details (shown in following screen- shot), also, you can download the invalid data by clicking on the “Invalid” button. You can now rectify the downloaded Invalid data and click on Upload template once again to upload the data.
Once you have uploaded the data, click on Verify/Submit to save the uploaded data to the portal.
2. Create Scheme: –
In this section, you can create a scheme for the required VPNs and add the required distributors or resellers you want to enable to use the scheme.
There are three steps involved in creating a scheme and we will see each of it in detail as below: –
2A. Scheme Definition: –
To create a Scheme, you need to first define the scheme as shown below-
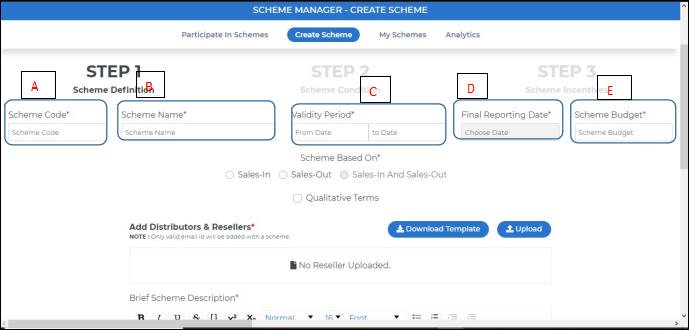
Scheme Code (A) is the code you wish to give to your scheme so that users can identify it. You can choose the Scheme Name (B) as per your requirement.
Validity Period (C) is the date range in which the scheme will be valid and needs to be set manually.
Final Reporting date (D) is the last date up to which the user can submit the data in the scheme and can be set as required.
Scheme Budget (E) would be the amount you would like to allocate for the scheme.
You can also choose whether the scheme is based on Sales-In or Sales Out and check for Qualitative Terms if needed.
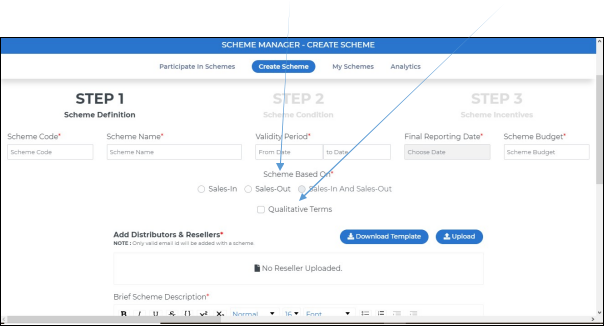
On Scrolling down, you will see the option to add the Distributors and Resellers you want to add in the scheme, by downloading the template, filling-in the required information and uploading it.
Below is the template you would see when you click on Download Template (replace demo data with yours)
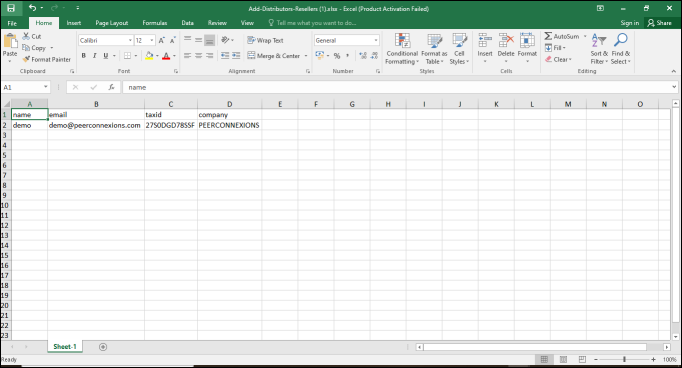
Note: Resellers or Distributors who are not registered on the portal can also be added in the scheme, but in order to access the scheme, they would have to register on the portal once they receive the email notifying that they are added in the scheme.
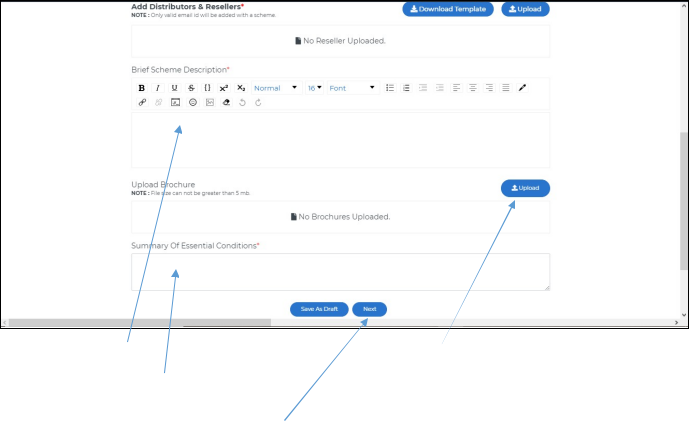
You can also put the description of the scheme in Brief and Upload the Brochure for the scheme if available.
You need to mention the “Summary of Essential Conditions” which are required to be fulfilled in order for the distributor or the reseller to participate in the Scheme.
Once you fill all the details, you can click on the “Next” Button to proceed further.
Note: In this section, mandatory fields are marked with a red asterisk (*) and have to be filled-in in order to proceed further.
2B. Scheme Condition: –
Here you can define what conditions that need to be satisfied when the distributor or reseller upload their data to be eligible for this scheme.
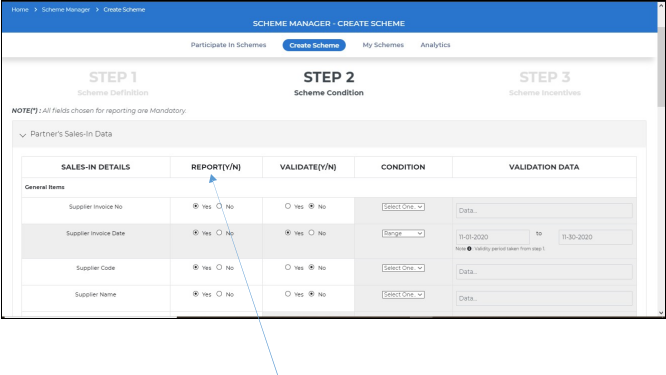
For example, for Supplier Invoice Number, if ‘Report’ is set to yes, then the user would have to upload the Supplier Invoice Number while uploading data for the scheme.
Similarly, if Validate is set to yes, then the user would have to satisfy the conditions mentioned in the validation to successfully upload the data.
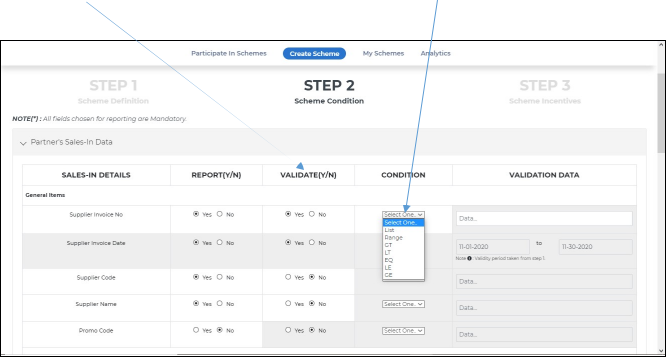
In the “Condition” column for the Supplier Invoice No, condition can be set for multiple options like
- List- The data entered while uploading data in the Supplier Invoice No must come from a list of data entered here.
- Range- The data entered while uploading data in the Supplier Invoice No must be in the range of these values.
- GT and LT- The data entered while uploading data in the Supplier Invoice No must be Greater Than (GT) or Less Than (LT) the mentioned value.
- EQ- The data entered while uploading data in the Supplier Invoice No must be equal (EQ) to the value entered here.
- LE and GE- The data entered while uploading data in the Supplier Invoice No must be ‘Less Than or Equal’ (LE) to or ‘Greater Than or Equal to’ (GE) the value entered here.
Note: All the options, for “Condition” are same for all the items (e.g. Supplier Name) in the entire list. You can also add a new field as per your requirement once you scroll down.
You can also add a new field as per your requirement once you scroll down.
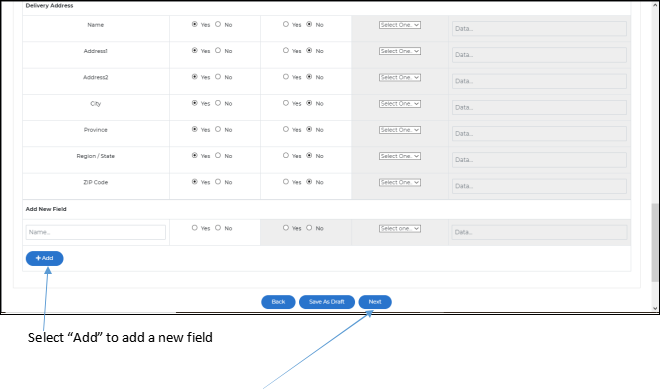
Once all the options are set, you can click on Next to Proceed.
2C. Scheme Incentives: –
In this section, you can give an appropriate title for the incentive and add the VPNs or the Manufacturer Part Numbers on which you would like to provide incentives in this scheme as shown next.
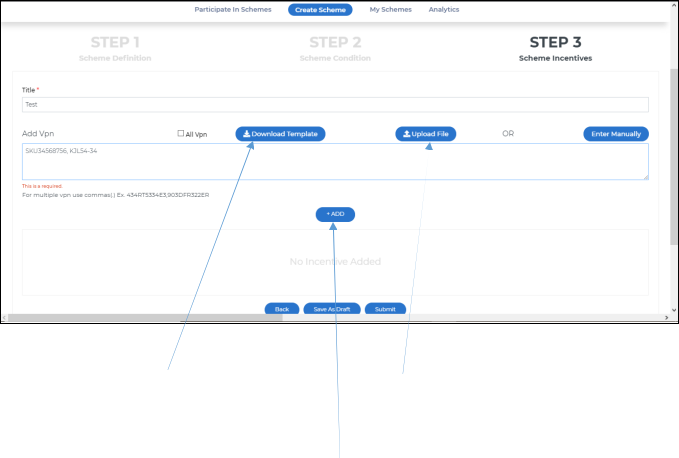
Here you can either download the template, fill the VPNs and upload it again to add the VPNs or you can directly enter it manually in the given box.
Note: If “All VPN” checkbox is checked, you would be able to add any VPN, even if it is not present in the system while uploading the data.
Once you add the required VPNs, you can click on the “Add” button to add the incentive to the scheme. You will then be presented with a new screen as shown below-

In the above section, you can set the required criteria, if you want to provide the incentive by quantity or by value and if it should be cumulative or incremental.
Also you can set the slab on which the value of the incentive will be calculated by clicking on the (+) button as shown below-
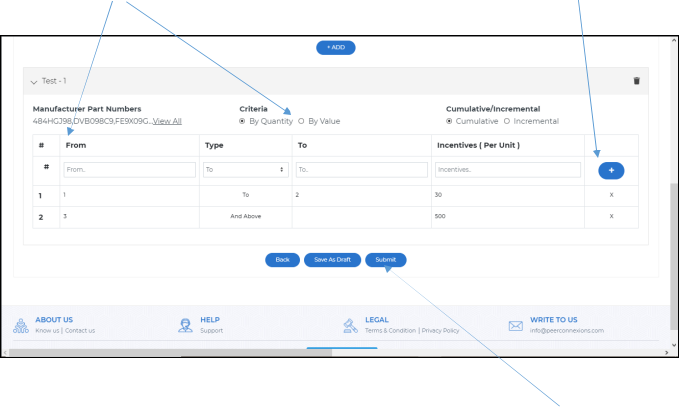
Once you have set the incentive criteria and verified all the information, you can now click on “Submit” to create the scheme in the portal.
On clicking Submit, you will get the message that the Scheme is created successfully. The distributors and resellers included in the list while creating the Scheme will be notified by email to participate in the created scheme.
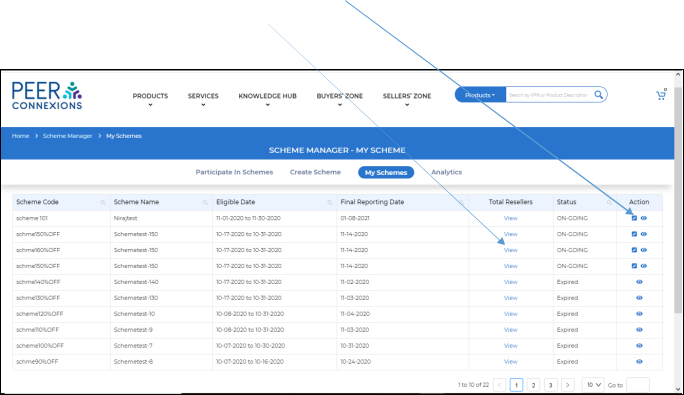
3. My Schemes: –
Here you will be able to see all the schemes created by you and you can also check details about each scheme by clicking on the “Eye” Symbol in the “Action” Column.
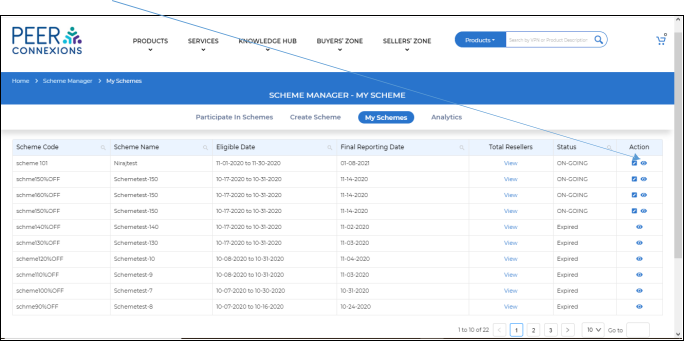
You can also edit an on-going scheme by clicking on the edit option. You can also view the Total Resellers who have participated in the scheme by clicking on “View”
Note: While editing a scheme, the final reporting date can be set to a maximum of 30 days beyond the end date of the Scheme.
4. Analytics: –
This section provides multiple reports which can be used to check the performance of the scheme. All of them are explained in detail below.
4A. Overall Report: –
In this report, details for all the schemes created by you are listed as shown below-
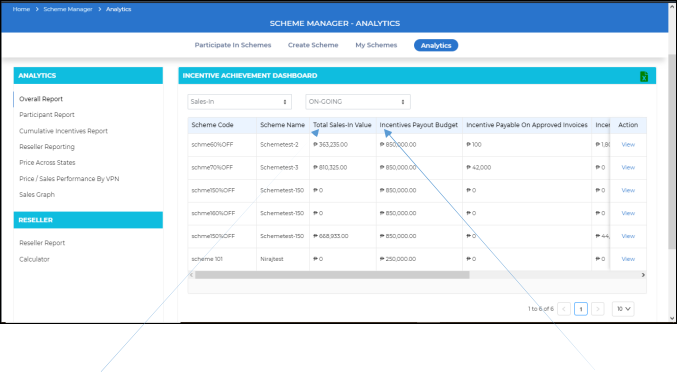
Here, the “Total Sales-in value” is the total value of the invoices uploaded in that scheme and “Incentives Payout Budget” is the budget of the scheme that was set while creating the scheme.
Also, we can see the “Incentive Payable on Approved Invoices” (A) and “Incentive Payable on Pending Invoices” (B) and the “Total of Approved and Pending Invoices” (C) as shown below-
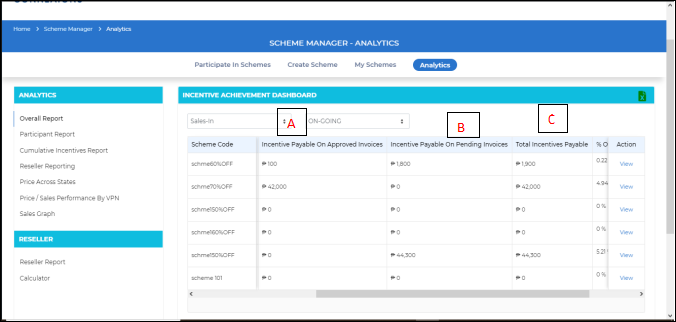
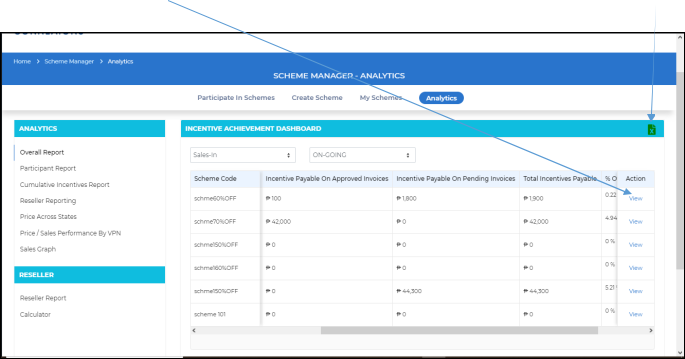
You can also click on “View” to see more details about a particular scheme. Also, you can click on the green “X” button to export this report to Excel.
4B. Participant Report: –
This report shows a graphical overview of the participants in the selected scheme
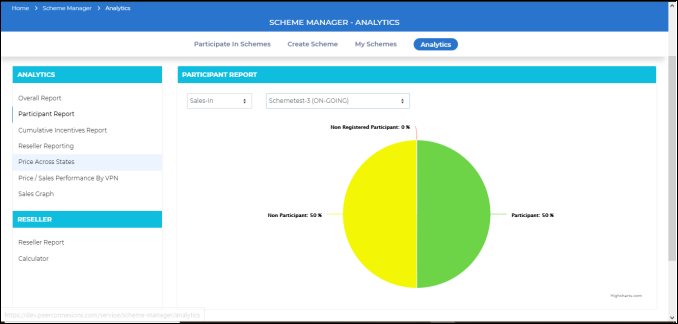
Here “Participant” refers to user count who have accepted the invitation to participate in the scheme and uploaded the data. “Non-Participants” refers to user count who have not yet viewed the invitation and also not uploaded any data.
“Non-Registered” refers to user count who are not yet registered on the portal, but the invitation has been sent to them to participate in the scheme via email.
4C. Cumulative Incentives Report: –
This is a graphical overview of Incentives for the selected scheme.
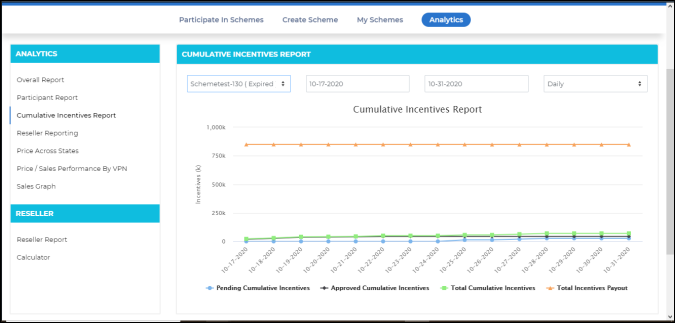
In the above report, you can see data for the selected date range as follows-
Total Incentives Payout shows the Scheme Budget which was setup while creating the scheme.
Total Cumulative Incentives would show the sum of Pending Cumulative Incentives and Approved Cumulative Incentives date-wise.
Approved Cumulative Incentives are the Incentives which have been provided to the user. Pending Cumulative Incentives are the Incentives which need to be approved by you.
Note: The data can also be viewed on a Daily, Weekly or Monthly Basis.
4. D Reseller Reporting: –
This report shows information about the resellers who have registered/are invited to the selected scheme.
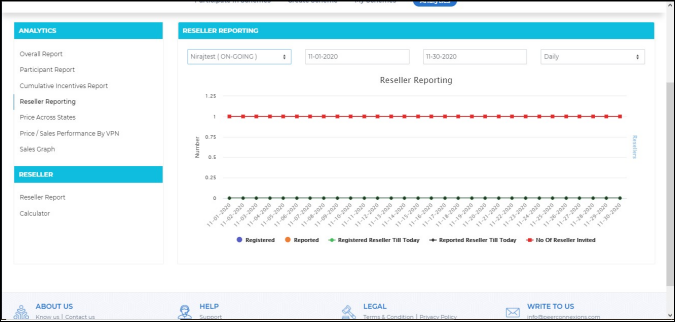
In the above report, you can see data for the selected date range as follows- Registered- This will show a spike as per user registration
Reported-This will show a spike on the date when users upload data
Registered Reseller till Today-This shows the count of resellers registered in the scheme till the respective date as per the selected range
Reported Reseller till Today-This shows a date-wise spike when registered resellers upload data (refer below sample graph)
Number of Reseller Invited-This shows count of resellers who are invited
Note: This data can also be viewed on a Daily, Weekly and Monthly basis

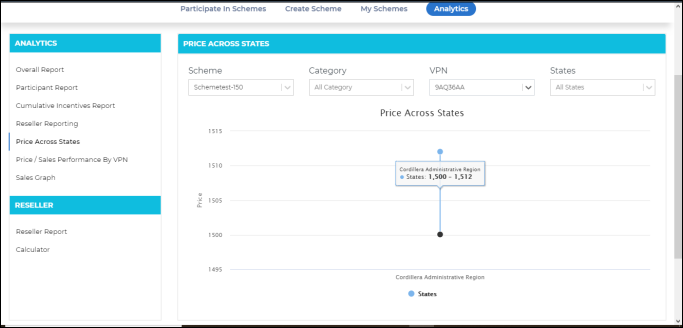
4E. Price across States: –
This shows the pricing of each VPN for the chosen states.
The below snapshot shows the report for selected multiple categories
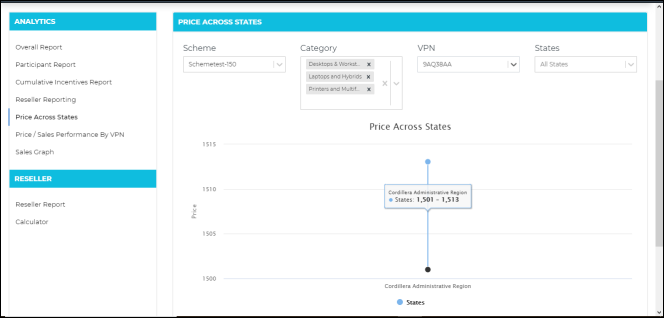
You can also select the category under which a specific VPN is available, select the VPN and select the required states for a combination view.
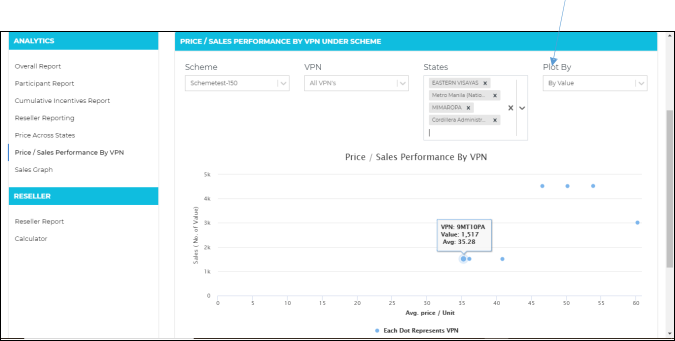
4F. Price /Sales Performance by VPN: –
This report shows the number of VPNs sold in the selected scheme, states and the average price of the VPNs sold.
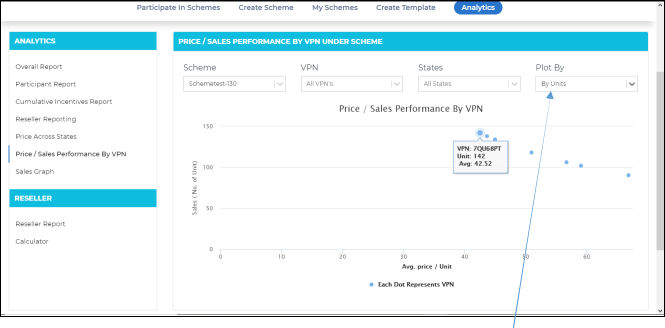
You can also select a specific VPN under VPN column. Sales can be viewed either by units or by value.
4G. Sales Graph: –
This graph shows the sales and the cumulative sales value for the selected date range.
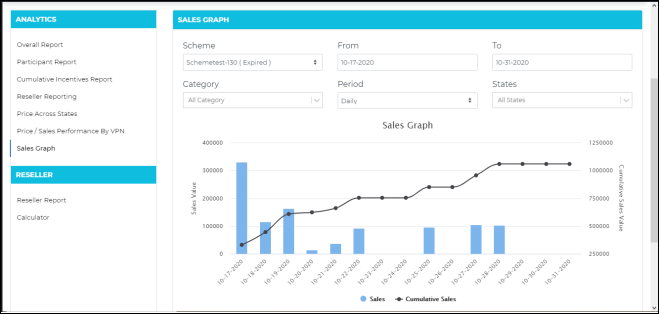
Cumulative Sales is the summation of all sales value including the date-wise sales.
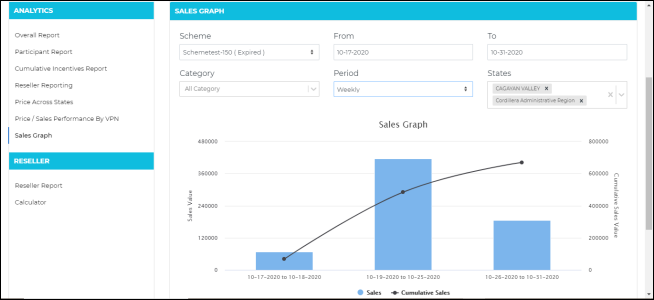
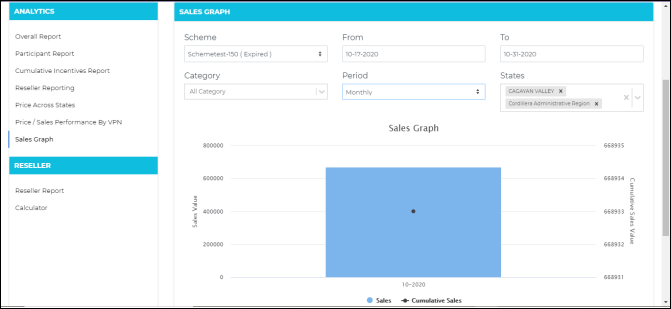
You can also view the sales figure state-wise and category-wise for the selected date range on a daily, weekly or monthly basis.
Below chart is a sample weekly report for the selected criteria.
Below is a sample monthly chart for the selected criteria.
5. Reseller Reports: –
Note: These reports can only be viewed if you are registered as a reseller in the system.
5A. Reseller Report-
This report shows the schemes you have participated in, the quantity of the VPNs eligible under the specific scheme, amount of sales done under the scheme and the “Incentive Accrued” against each scheme.
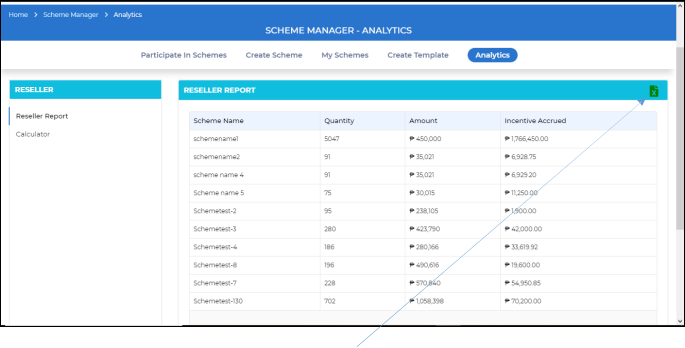
This report can also be exported to Excel using the green ‘X’ button at the top.
5B. Calculator-
This utility can be used to calculate the incentive from a specific scheme if the quantity of the VPN is changed.
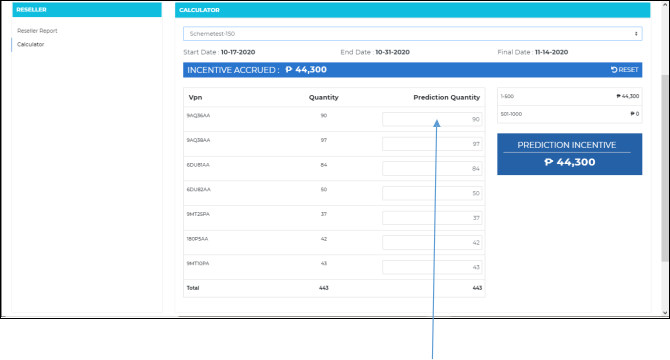
When you select any scheme, it automatically takes the current quantity of the VPN and displays the Prediction Incentive. You can change the quantity of the VPN under Prediction Quantity to see how it would affect the incentive for the scheme.
End of Document