
Hello, Hope you are enjoying using the Peerconnexions portal. Today we will see in detail how we can manage Inventory, Freight and Pricing on the portal.
- Manage Inventory
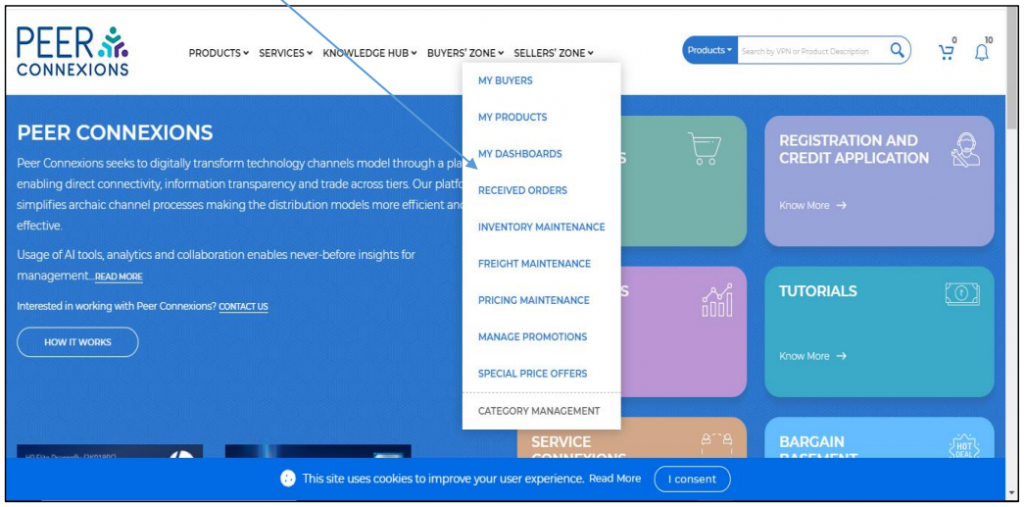
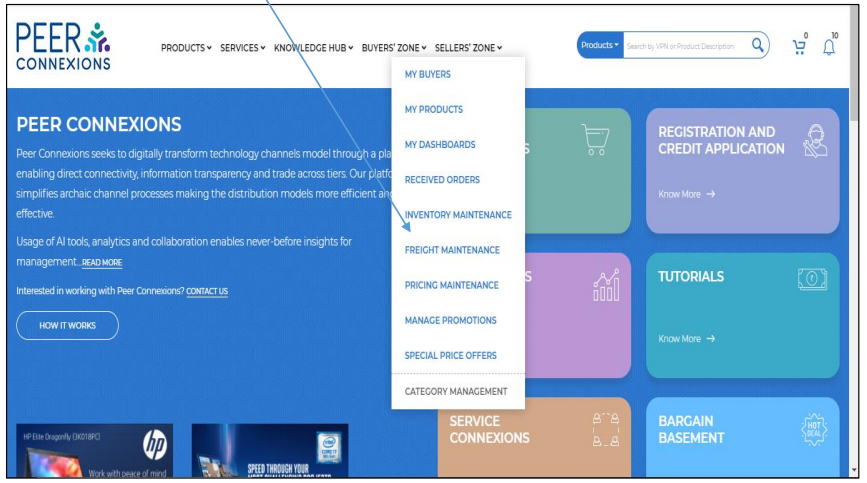
You can go to the Inventory Maintenance section on the portal from the
homepage by clicking on Sellers’ Zone->Inventory Maintenance as shown in the
image below-
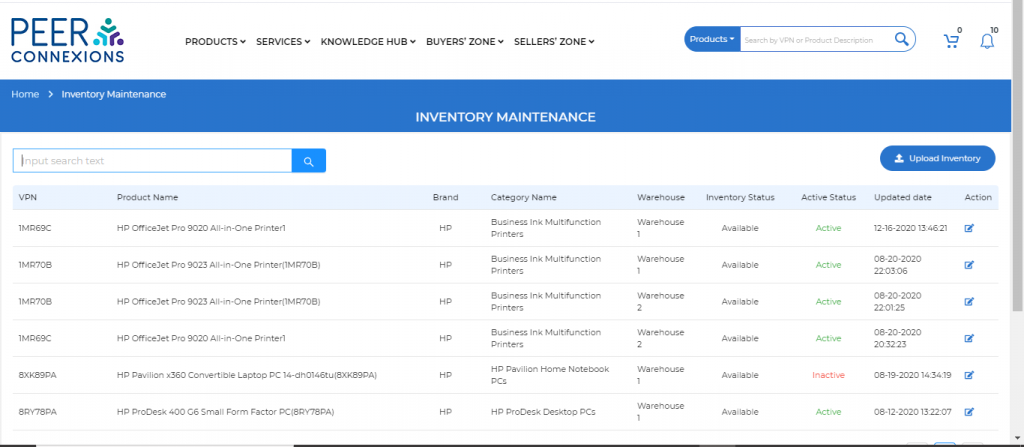
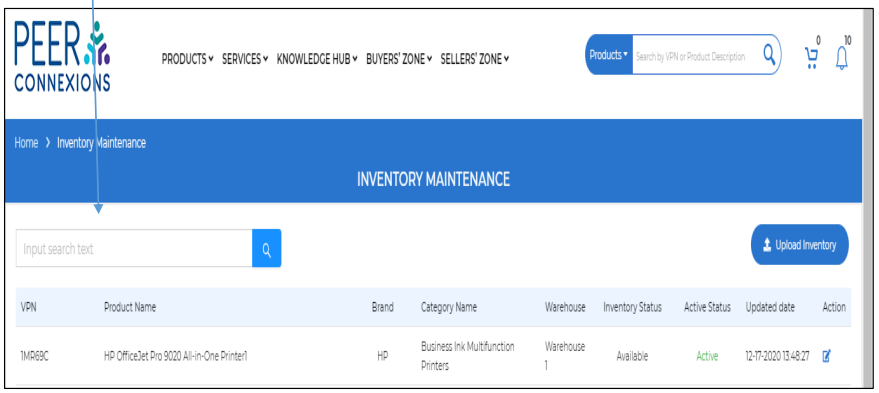
This will direct you to the Inventory Maintenance Page as shown below-
On this page, you can click on the Upload Inventory Option which will direct you to a new page as shown below-
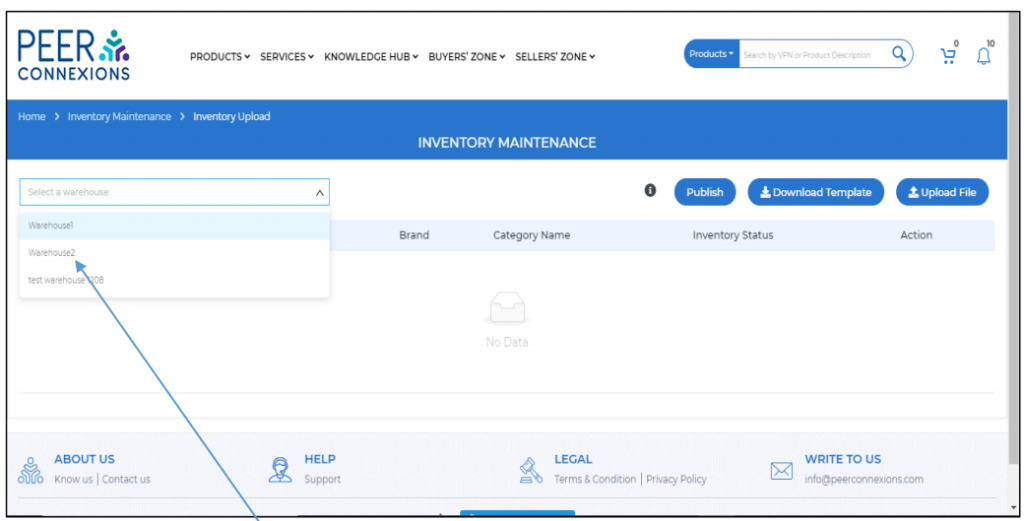
Here you need to select the warehouse for which you want to upload the Inventory.
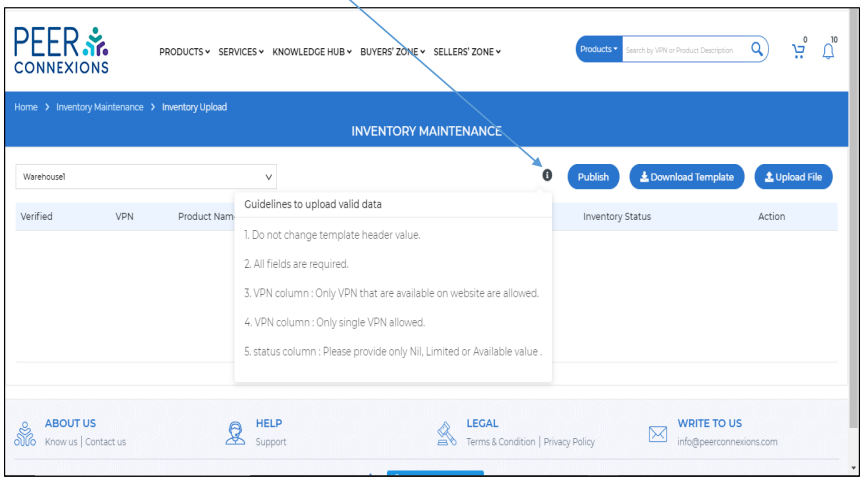
You can also hover over the (i) symbol to see the Guidelines to upload the data as shown below-
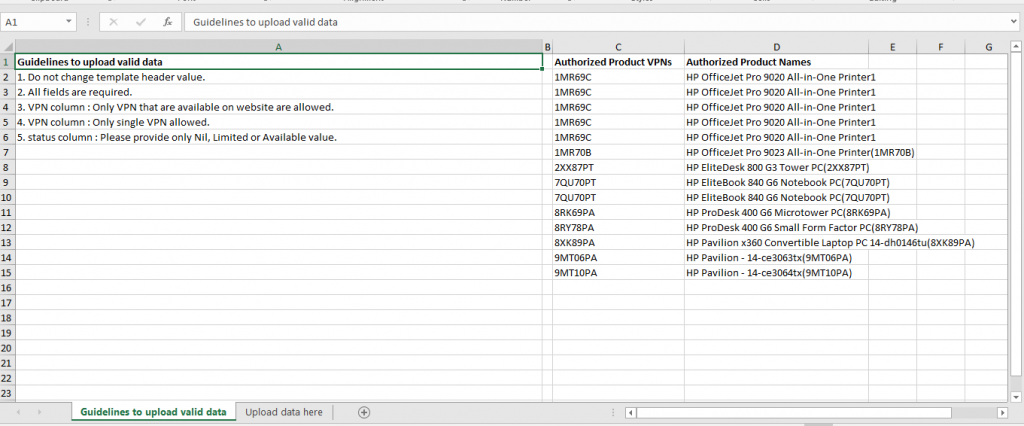
Once you download the template, you will be able to see the VPNs for which you are authorized to Upload the Inventory in the ‘Guidelines to Upload Valid data’ sheet as shown below-
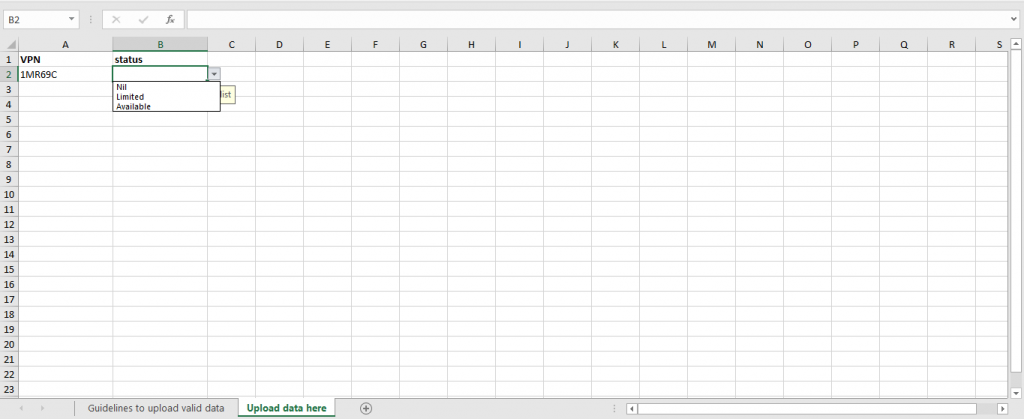
Now you can go to the ‘Upload data here’ sheet and add the required VPNs for which you want to upload the Inventory Status. The Status can either be Nil, Available or Limited as shown below-
Once you select the status and Save the Excel and Click on Upload Template, it will show the uploaded VPN as below before you Publish it-
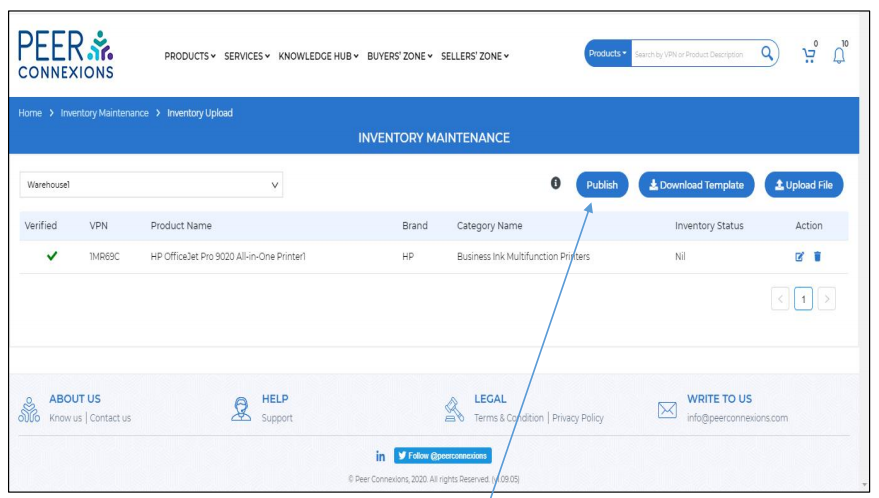
Now you can Publish this Inventory Status by clicking on the Publish Button. On Publish, the status of the VPN will show as Active.
After you Publish the Inventory Status, you can go back to the Inventory Maintenance section to see if it is now visible under it as shown below-
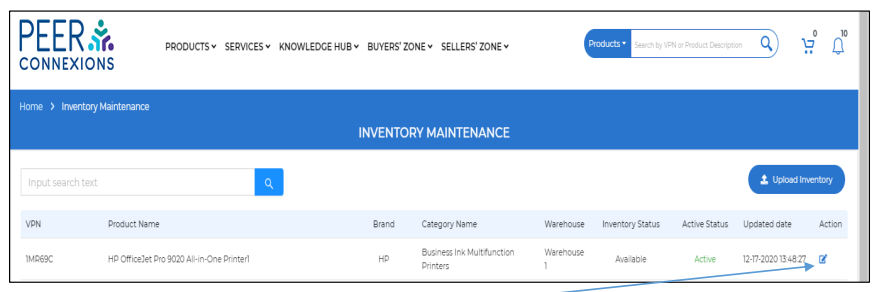
Here you can edit the Inventory Status by clicking on the Edit Button under the Action column.
Once you click on the Edit button, it will direct you to a new page as shown below-
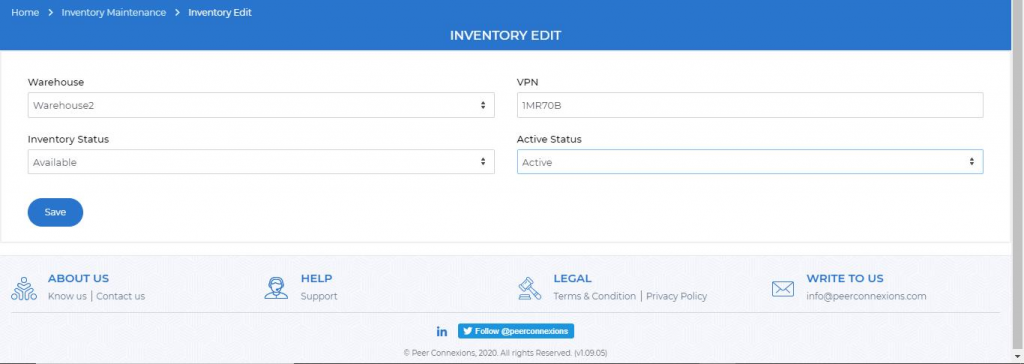
You can update the Warehouse, Inventory Status and Active Status as required.
In the Search box below, you can search by VPN, Product Name, Brand, Category Name, Warehouse, Inventory Status-
- Manage Freight-
In this section, we will understand how you can manage Freight on the portal for smooth order processing.
Note: In order to add Freight, it is mandatory to add a warehouse from My Profile>Addresses.
You can access the Freight Maintenance section from the homepage by going to Sellers’ Zone>Freight Maintenance as shown below-
Once you click on Freight Maintenance, you will be directed to a new page as shown below-
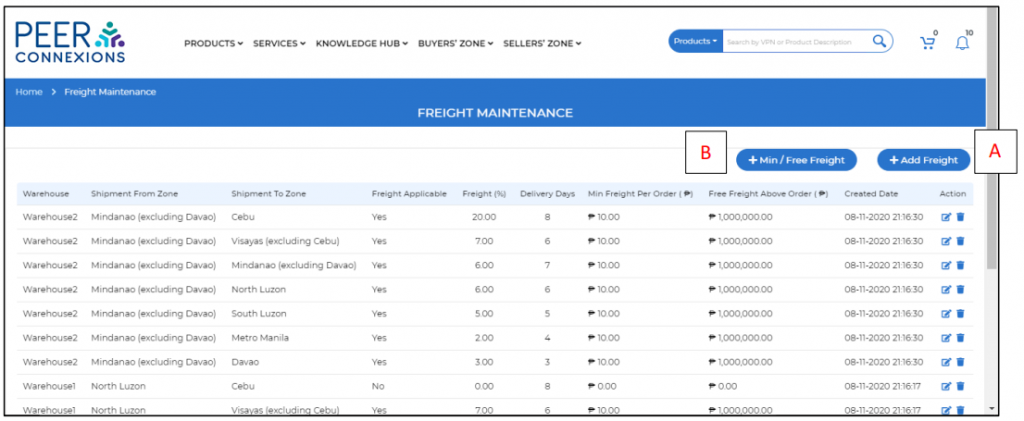
Here you can Add the Freight(A) for the required region and also add the Minimum and Free Freight Per Order. (B)
Once you click on +Min/Free Freight Button, it will open a pop up as shown below-
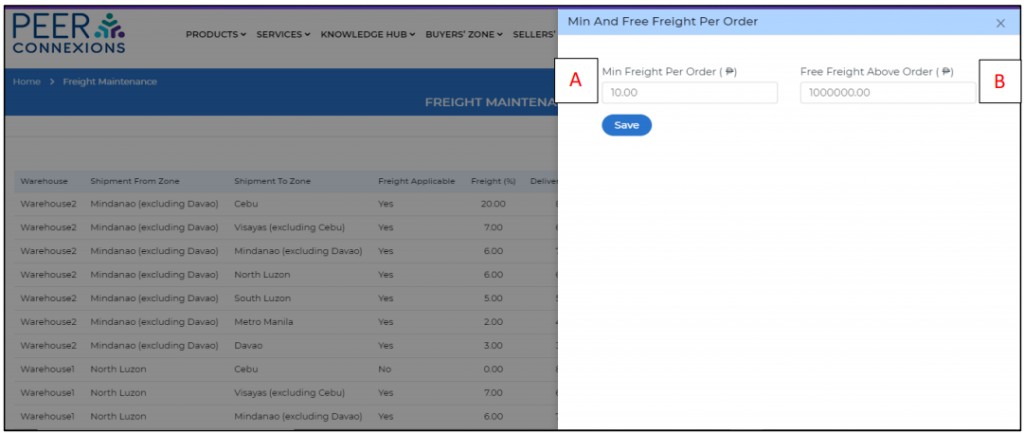
Here you can set the Minimum Freight Per order(A) and Free Freight Above Order Amount(B) as per your requirement.
You can go back to the Freight Maintenance screen by clicking the close(X) option.
Now you can add the Freight by clicking on the Add Freight Option, it will pop up a new box as shown below-
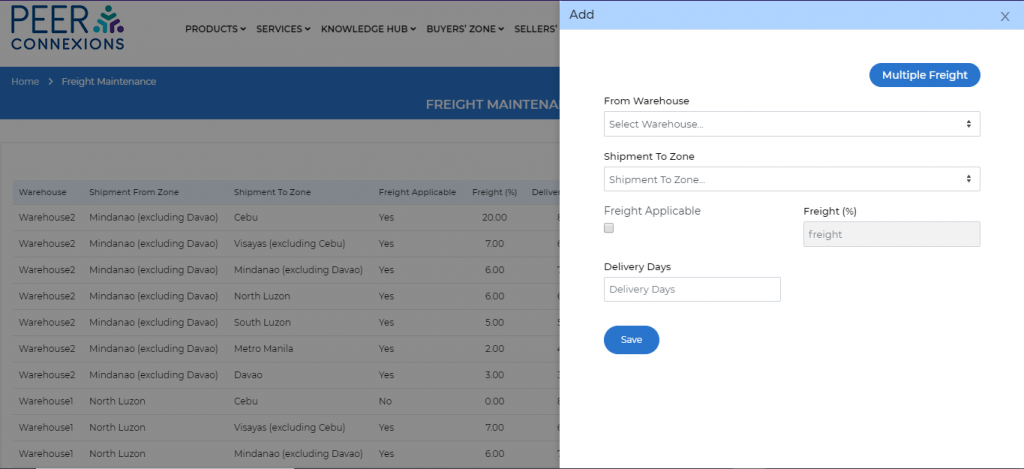
Here you can set the Freight for each warehouse for each location respectively as shown below-
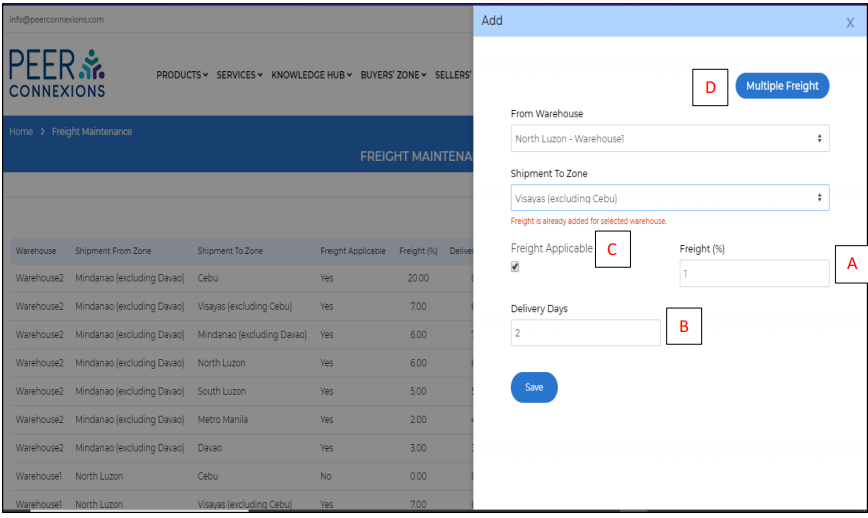
You can set the Percentage of Freight applicable(A) and also the Delivery Days(B) from this warehouse to the selected location.
If you wish to not charge any Freight for this warehouse for the selected location, you can keep the Freight Applicable(C) box unchecked.
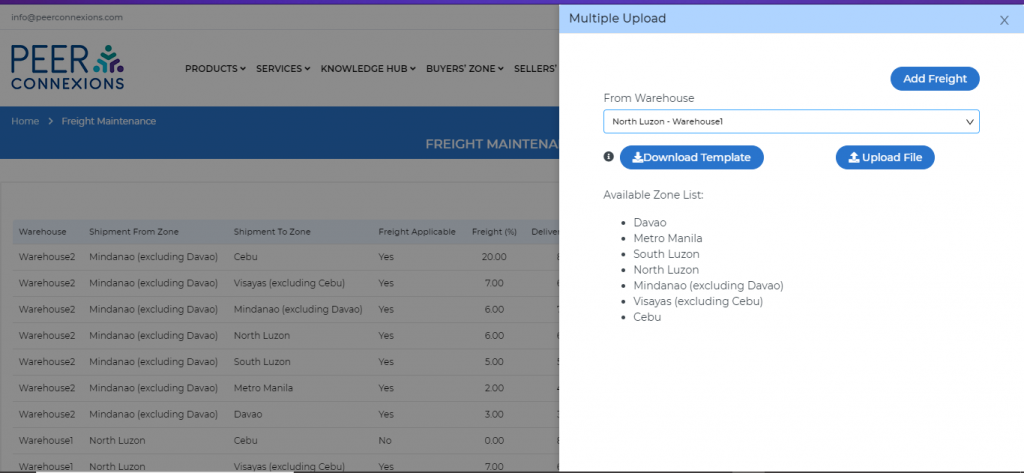
If you wish to add Multiple Freights for Multiple Warehouses, you can click on the Multiple Freight option(D) which will open a new pop up as shown below-
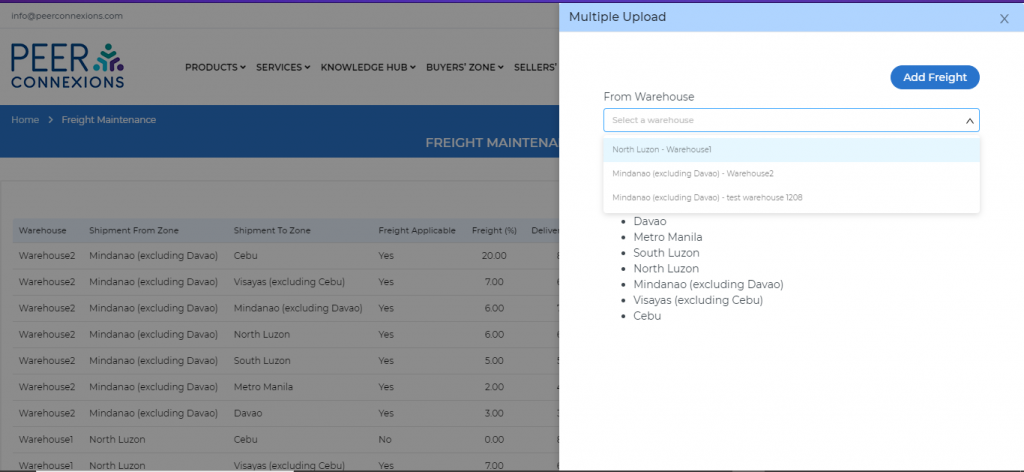
Here, you can select the required warehouse, click on download template as shown below-
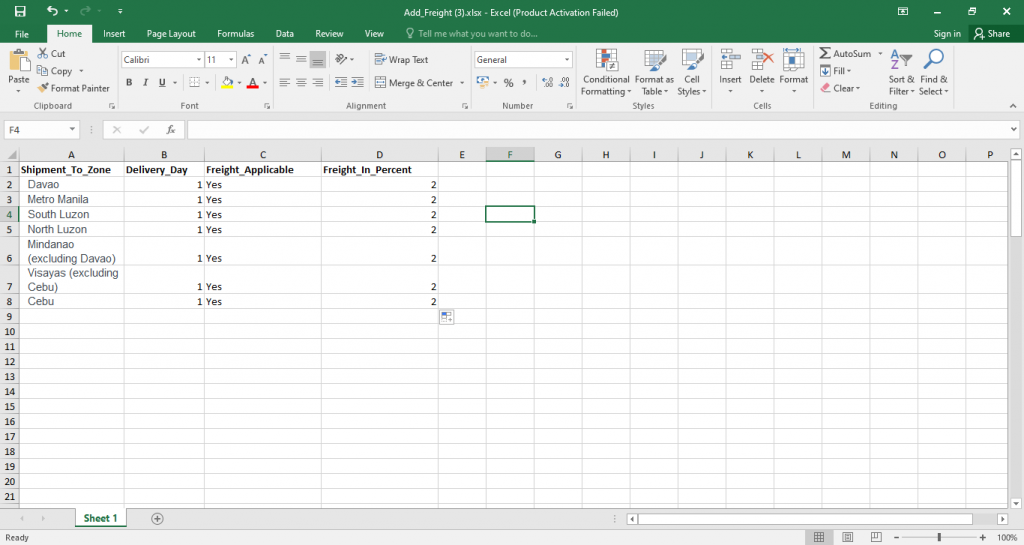
Once you download the template, you can add the details as shown below and upload it by saving the excel and clicking on the Upload File button-
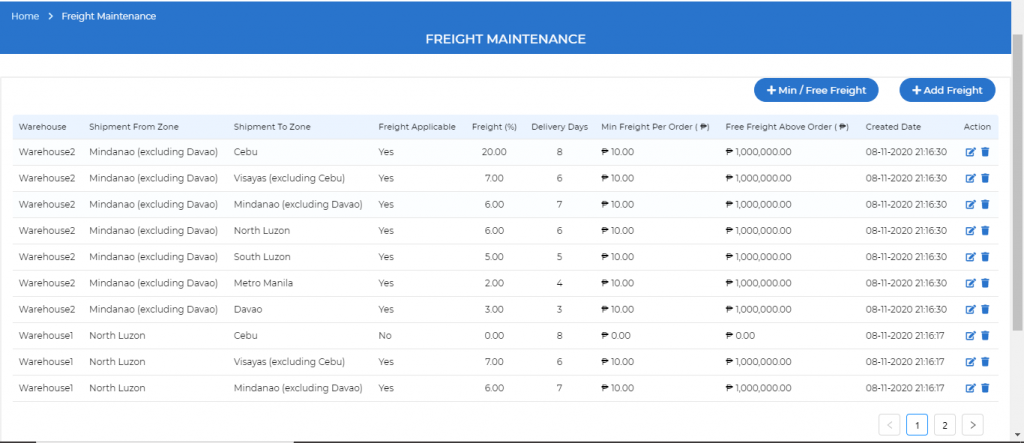
Once you upload the file, the new freight charges would be visible as shown below
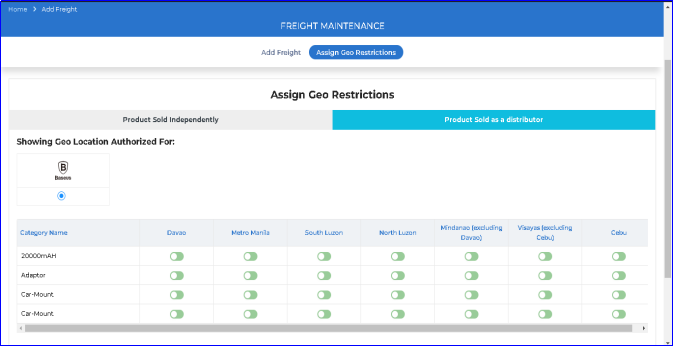
We have added a new feature of Assigning Geo Restriction for your independent products as shown below-
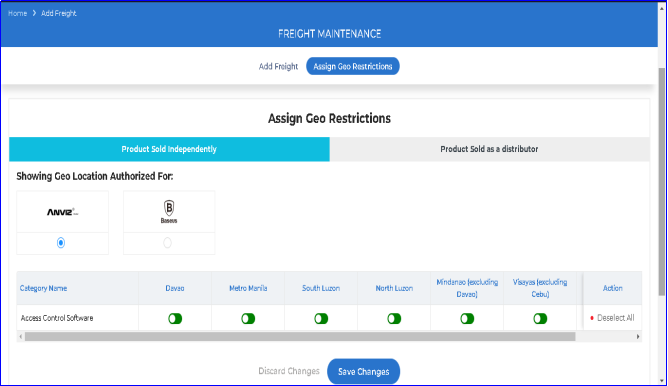
Here you can choose for which location you want to restrict your company from selling your independent products if required, by turning of the button for that location in the above screen and saving the changes.
For products authorized to you as a distributor, you can only see the Geo Restriction set by the category manager, but it is not editable as shown below-
We will learn about the new features added in the Pricing Module on the peerconnexions portal.
1. Buyers’ Classification-
Ever thought about giving more discount to a specific buyer?.
We have got you covered with this new feature.
Using this feature, you will be able to classify your buyers on the portal in four classifications namely -Bronze, Silver, Gold, Platinum.
For each of the above classification of buyers, you can set up the pricing based on VPNs as well as categories.
Note: The pricing for the Buyer Classification will have a pricing setup as follows-
1.Platinum Buyers will get the maximum discount followed by Gold, Silver and Bronze. The discount order will be as follows- Platinum>Gold>Silver>Bronze.
2. If pricing for any VPN or Category is not uploaded for Silver Users, the Bronze pricing will be considered for them.
Similarly, if Platinum pricing is not uploaded, the gold pricing will be considered for Platinum buyers and if gold pricing is not uploaded then silver pricing will be considered for gold buyers.
If Platinum and Gold pricing is not uploaded, the silver pricing will be considered for Platinum and Gold users, if Platinum, gold and silver pricing is not uploaded, the bronze pricing will be considered for all of the three users.
3.Even if a Buyer is not classified, the Bronze pricing of the VPN or category is applicable for the Buyer.
4. It is not mandatory to classify the buyers on the portal, but this feature can be used as per requirement.
5. The discount order cannot be changed for a specific classification of Buyers- For eg- Silver and Gold Buyers cannot be given more discount than Platinum Buyers.
6. Uploading Bronze price is mandatory for each VPN or Category as it is the basic pricing.
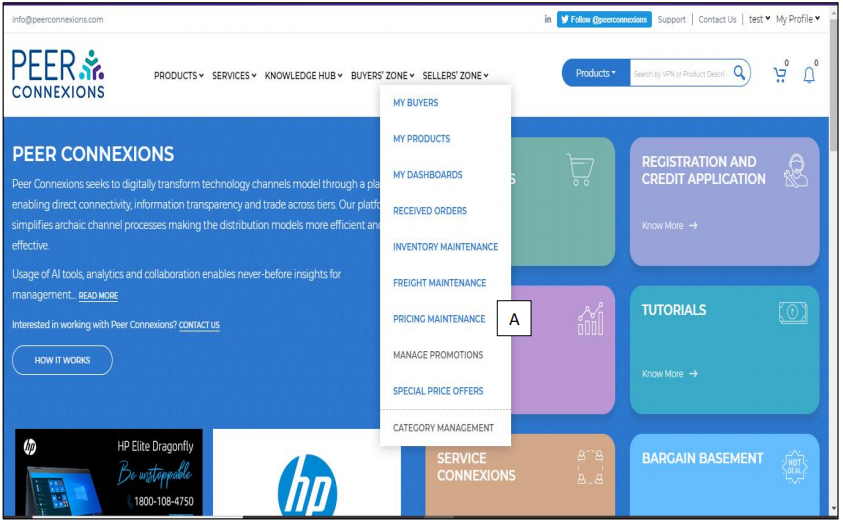
To classify the buyers, you can go to Seller’s Zone>Pricing
Maintenance(A)>Buyers’ Classification(B) as shown below-
Once you click on Buyer’s Classification, you will see a screen as shown below-
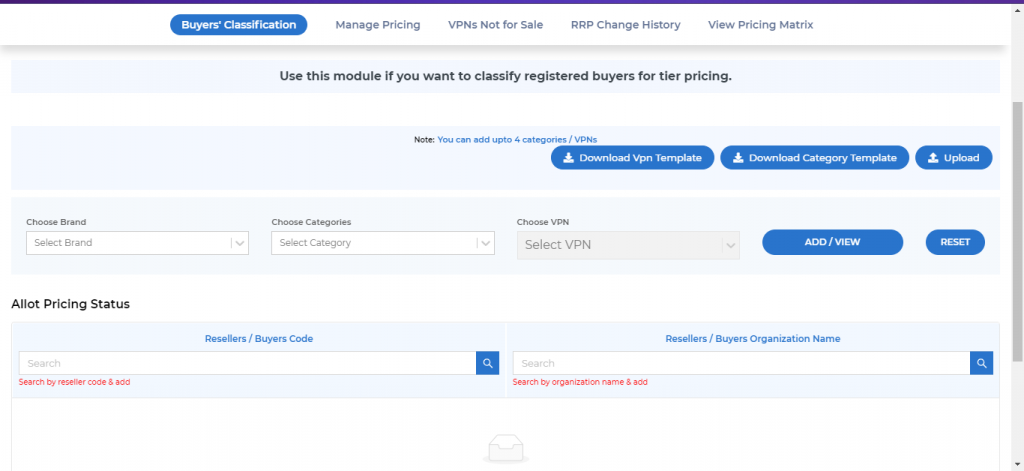
Here, you can choose the Brand, the category and VPN if any specific Vpn pricing is needed to be classified and click on add/view. You can also search your registered buyers by Organization /Name or Reseller Code by searching in the provided boxes under the Allot Pricing Status option as shown below-
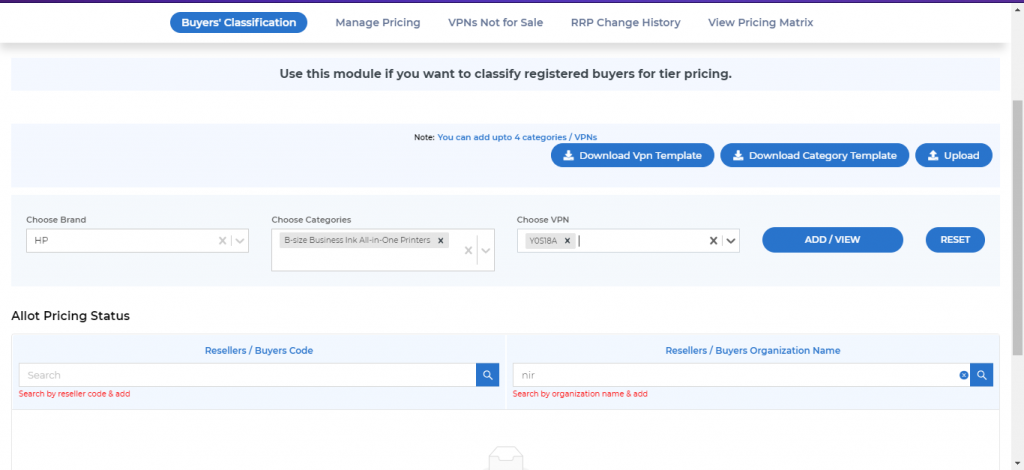
If you need to classify an entire category, you can keep the choose VPN drop down blank and click on the add/view button, which will show your registered buyers as shown below-
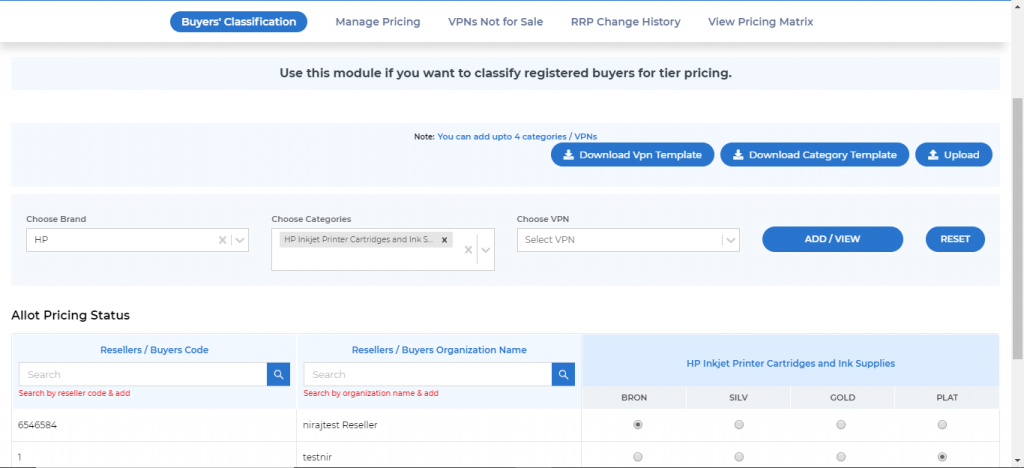
Here you can set up the classification of the selected category for the required reseller by selecting the radio button under the Bron, Silv, Gold, Plat columns as shown above.
This same process can be done by using the Download VPN Template and Download Category Template Option.
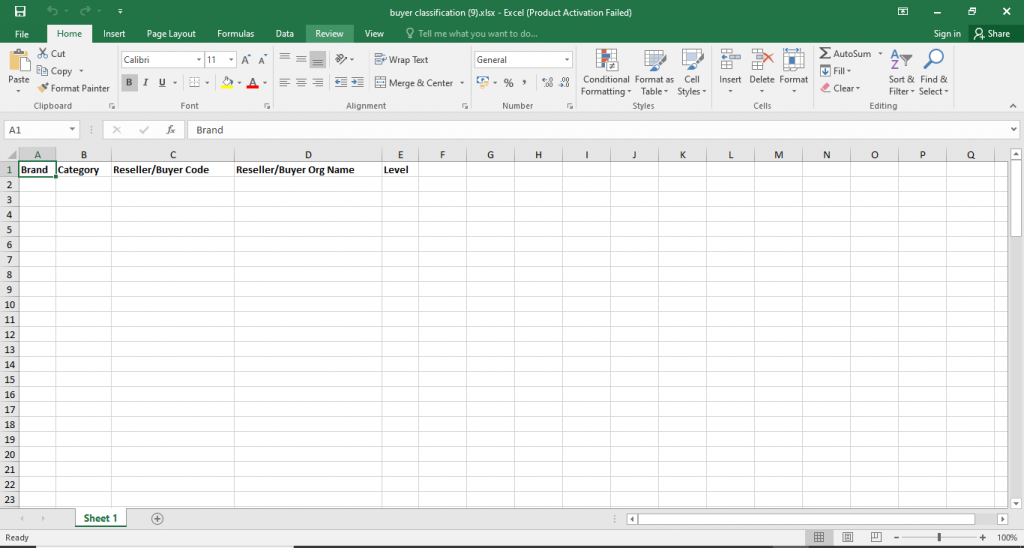
The VPN Template is downloaded as below-
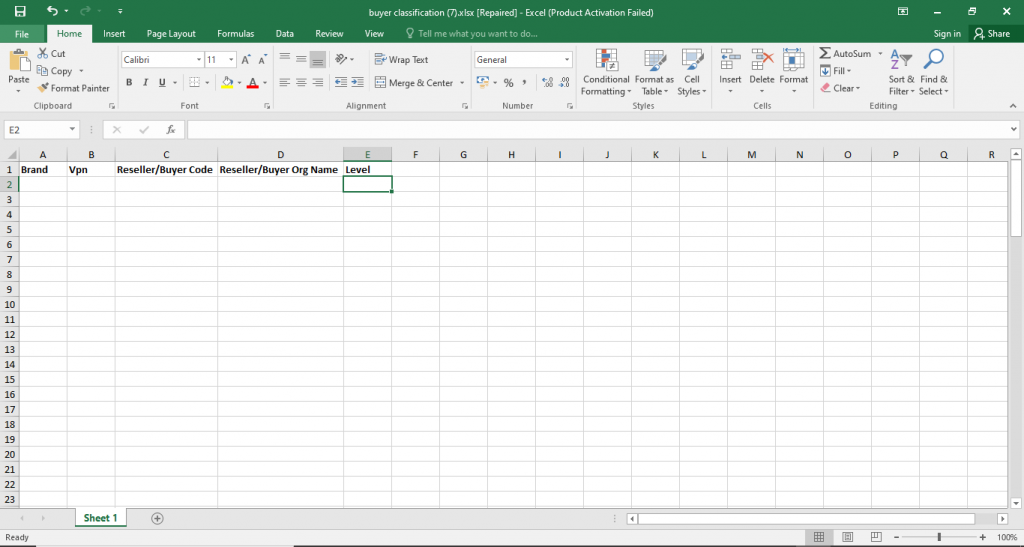
Here you can select the Brand, VPN, Reseller code, Reseller Organization Name, level(Platinum,Gold,Silver,Bronze).
Once you enter this information, you can upload this excel by clicking on the upload template option. You will see the below screen after the excel is uploaded-
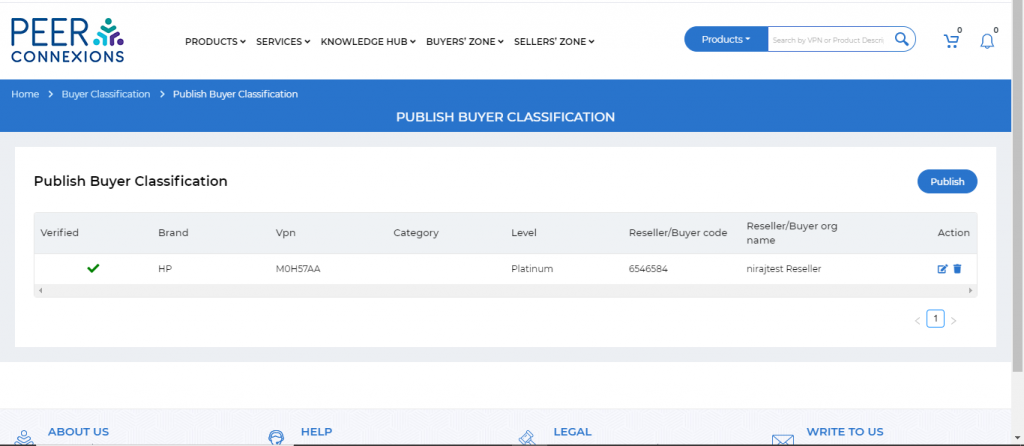
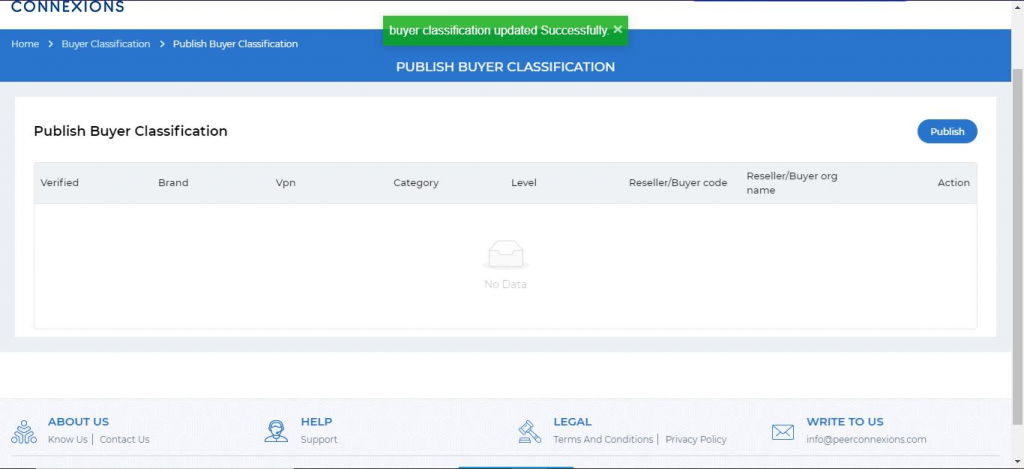
Now you can click on the Publish button to publish this Classification.
After you click on Publish, you will see the message as below-
Similary, you can download the category template as shown below-
Here you can select the Brand, Category, Reseller code, Reseller Organization Name, level(Platinum,Gold,Silver,Bronze).
You can upload this template and publish the data similarly as shown above.
Note: Maximum 4 categories/VPNs can be uploaded in a single template.
This sums up the Buyers’ Classification module.
2. View Pricing Matrix-
So now that we have set up the pricing, we have a separate screen called View Pricing Matrix where we can see the pricing for a particular reseller.
You can access this under the Pricing Mainenance section by clicking on View Pricing Matrix as shown below-
Once you click on view pricing matrix, you will be redirected to a new screen as shown below-
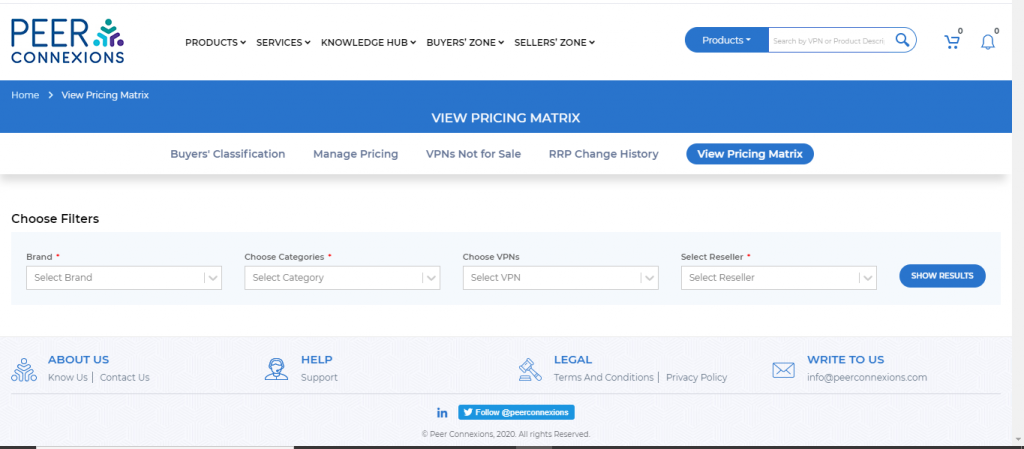
Here you can select the Brand, the required category, select the specific reseller, click on Show Results to see the pricing setup for the required category, if you want to view the pricing setup for a specific VPN, you can choose the required
VPN and then select the reseller and click on show results.
You will see a screen as shown in the below picture-
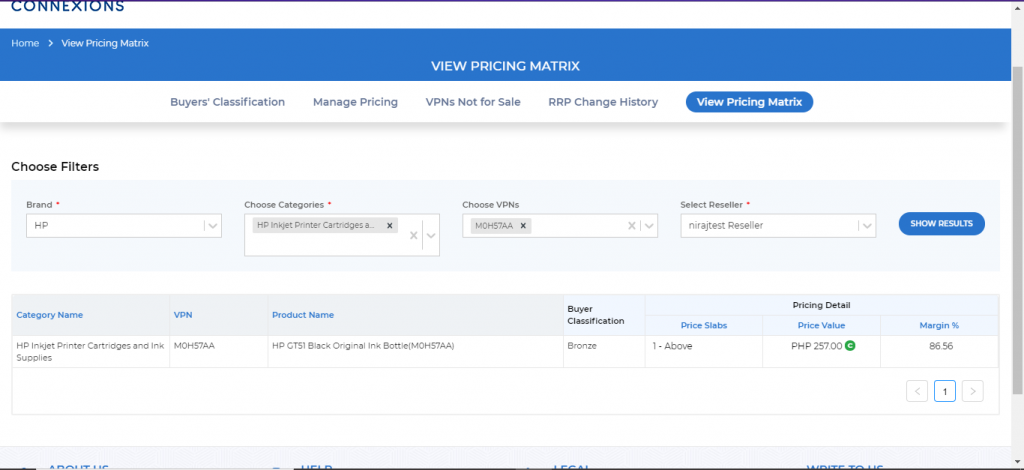
You will be able to see that for a specific reseller, for a specific VPN or category, what is the Buyer Classification and also the exact price value for the VPN.
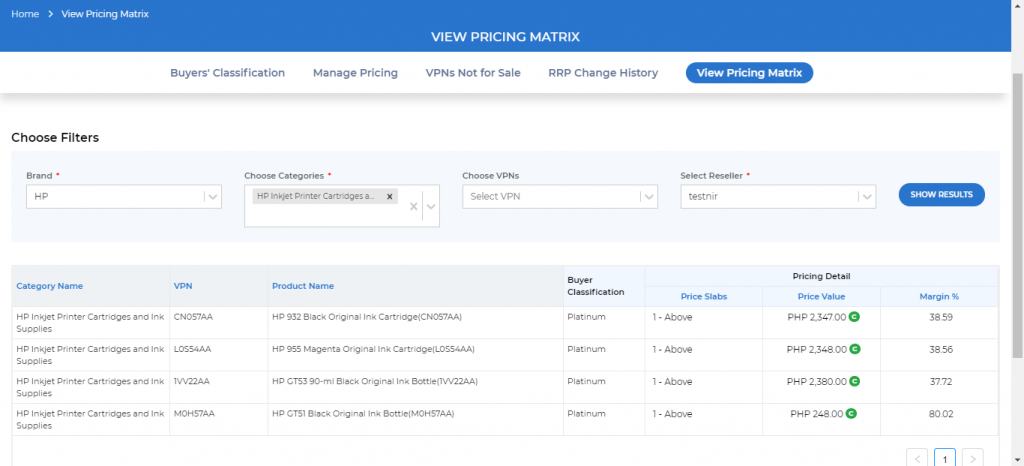
As you can see in the above picture, all VPNs under a specific category are shown with their pricing details.
3. Manage Pricing-
So now we come to the last part of the tutorial, which is setting up the pricing for the required VPNs and categories.
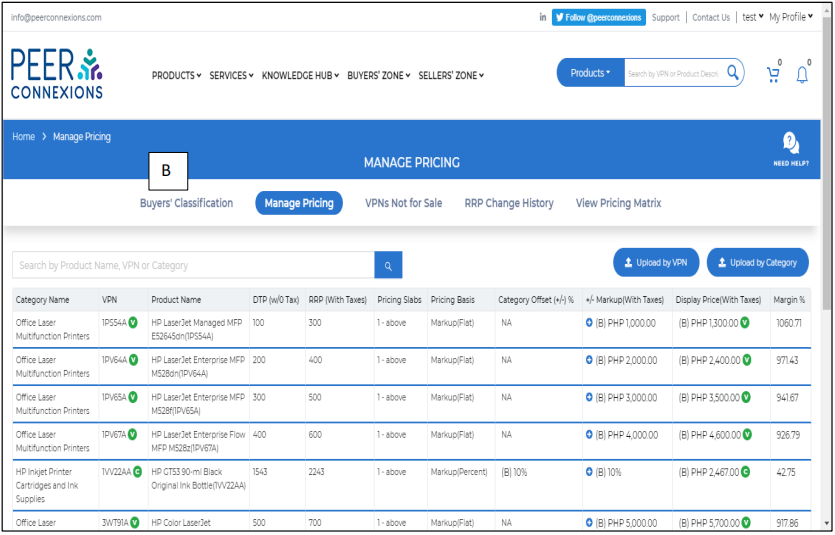
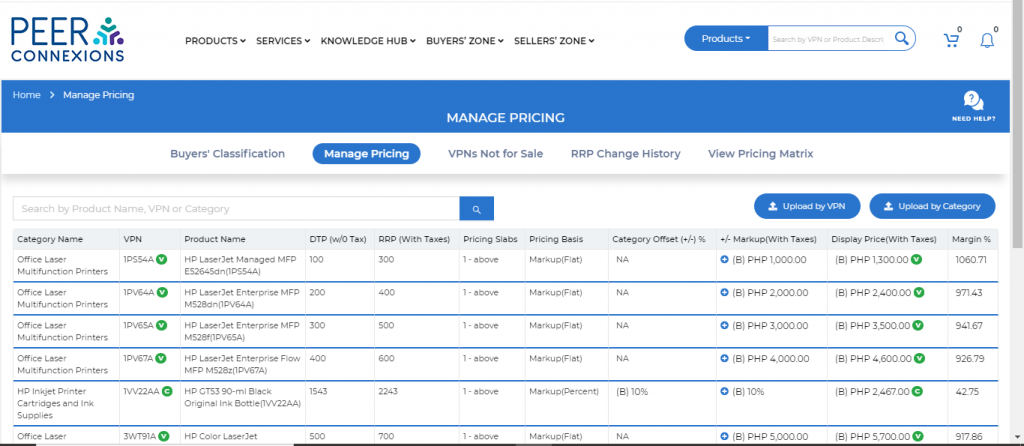
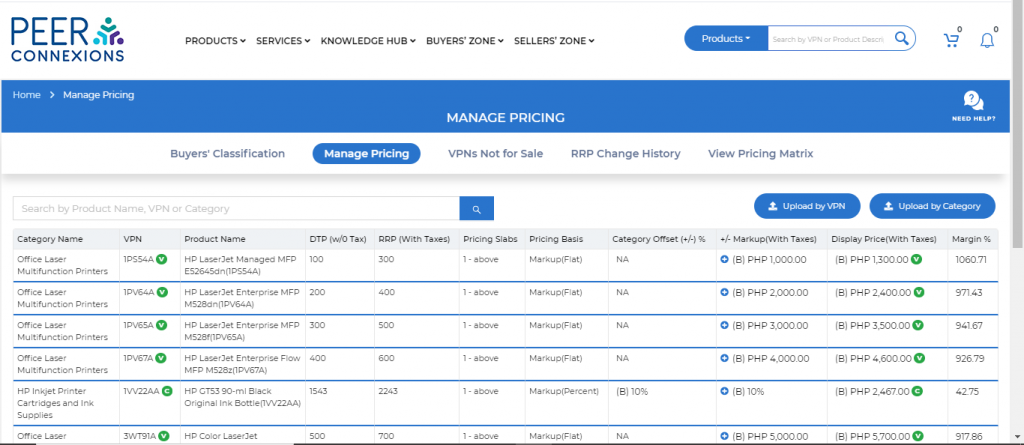
To setup the pricing by VPN, you can go to Sellers’ Zone>Pricing Maintenance>Manage Pricing and it will show a screen as below-
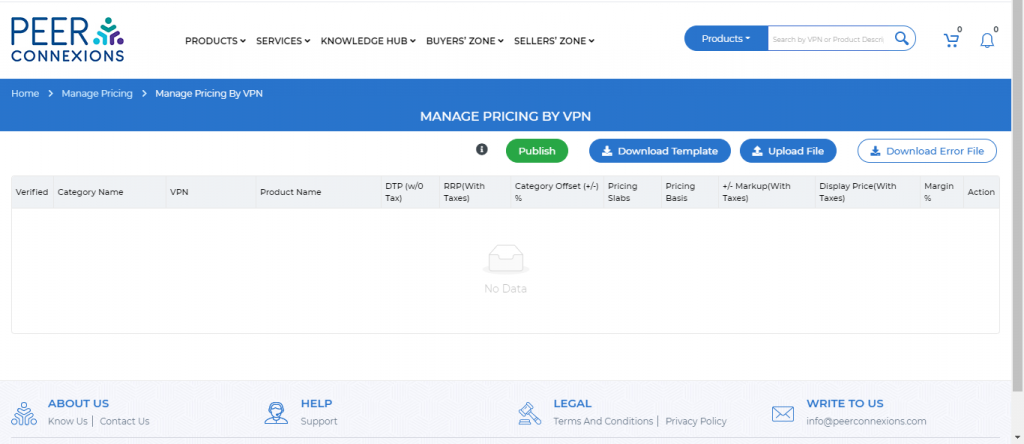
You can click on Upload by VPN, which will take you to the below screen from where you can download the template-
Once you click on download template, an excel sheet will be downloaded as shown below-
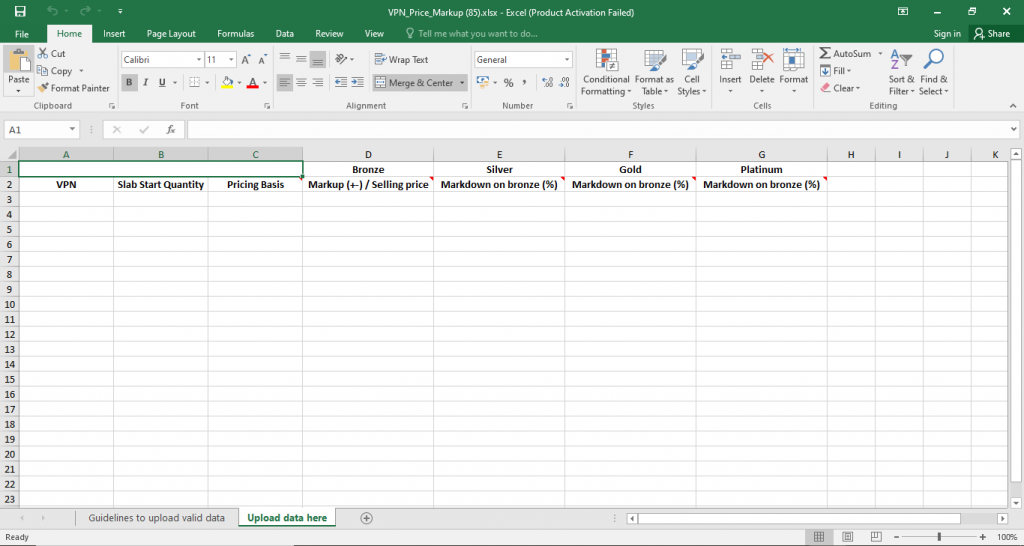
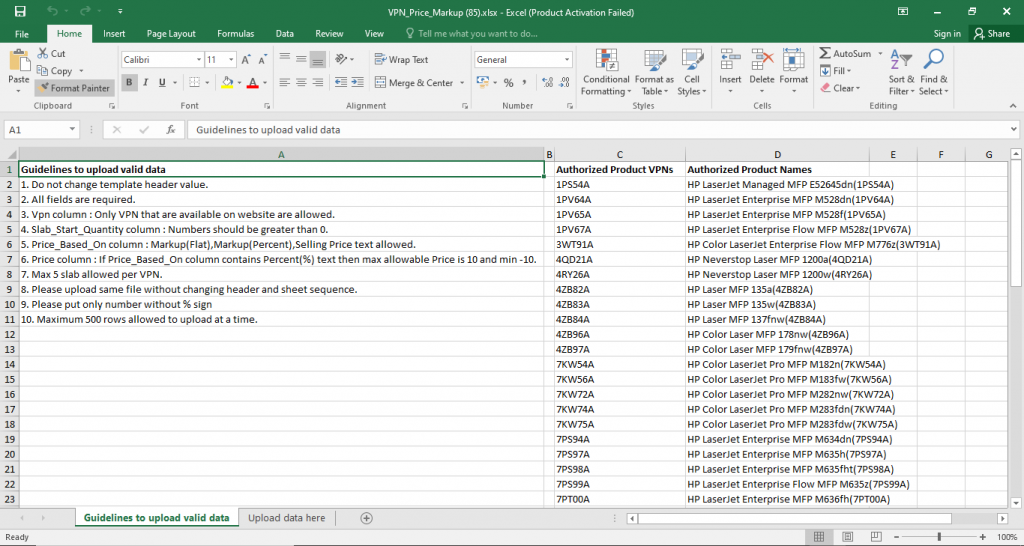
Here you can add the VPN from the authorized list of VPNs present under the Guidelines to upload valid data sheet which are shown below-
As you can see in the below picture, the VPN 1PV67A is added with slabs of 1, 3, 5.
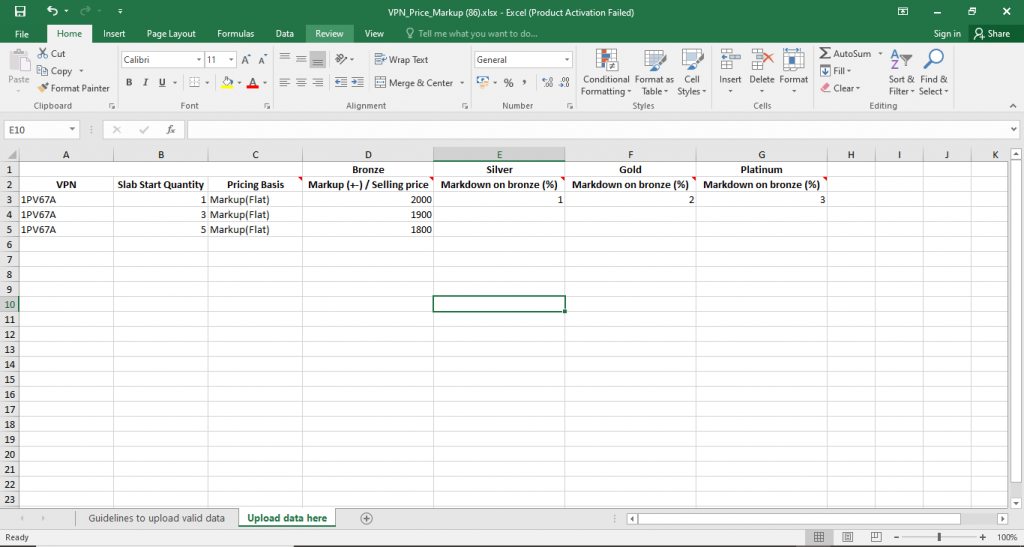
Note:The Pricing Basis(Flat/Percent markup/Selling Price) for a VPN should be same in all the slabs.
Note:The discount/markdown given on the ‘first slab’ for silver/gold/platinum will be considered for all the slabs even if you enter any other data under silver/gold/platinum for other slabs.
Note:The discount/markdown will be considered as a percentage discount/markdown on the Bronze price added for the VPN.
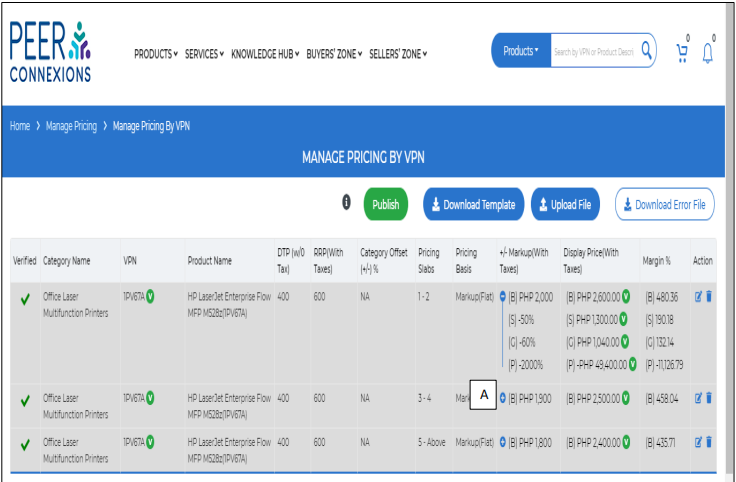
Now you can upload the template and see the preview as shown below-
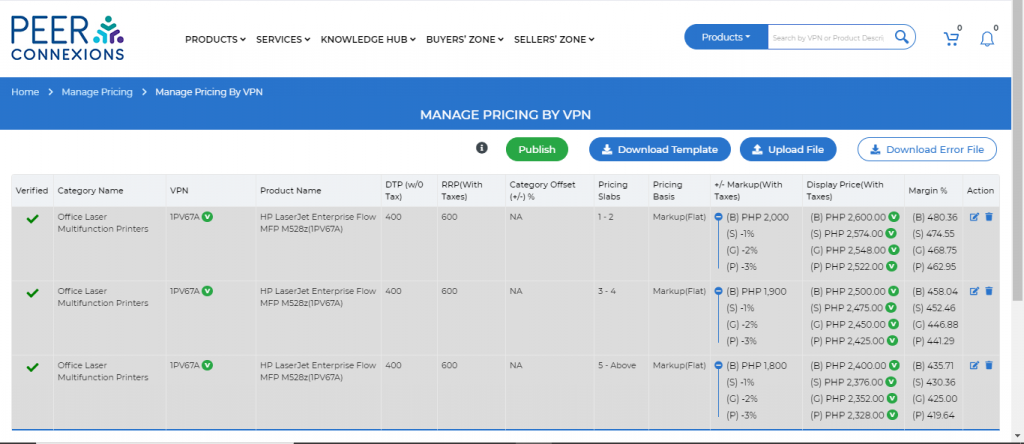
In order to view the Silver,Gold,Platinum pricing, you have to click on the Plus(+) sign(A) under Markup(with Taxes) column as shown below-
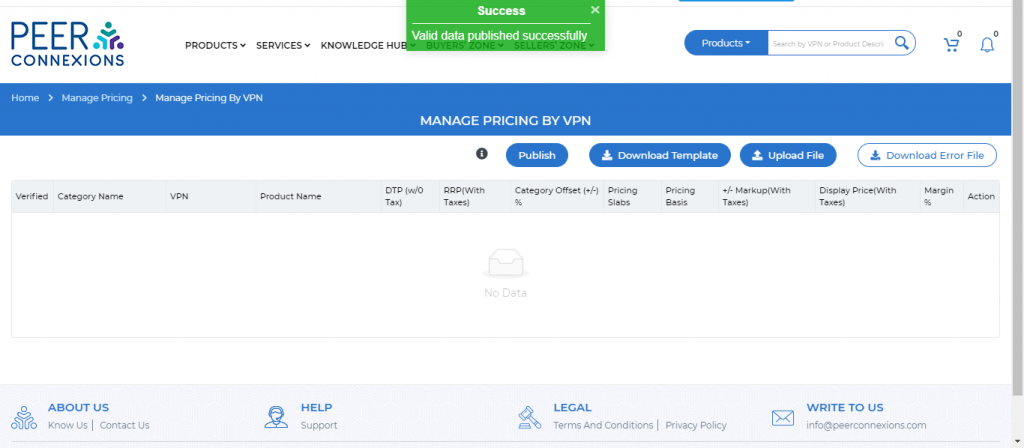
Now you can click on the Publish Button and you will get the message as shown below-
Similarly, you can upload the pricing by category by clicking on upload by category on the below screen-

Now you can download the template which will open as shown below-

You can add the percent markup in Bronze and the required discount/markdown for Silver/Gold/Platinum for the specific category.
On uploading the template, you can see a preview as shown below-
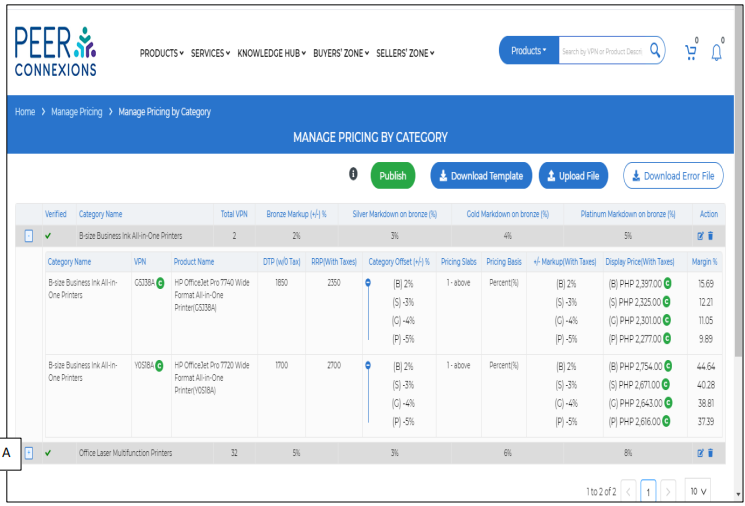
You can verify the pricing fo each category by clicking on the Plus(+) sign(A) as shown in the above image.
Now you can click on Publish and you will see a screen as shown below-
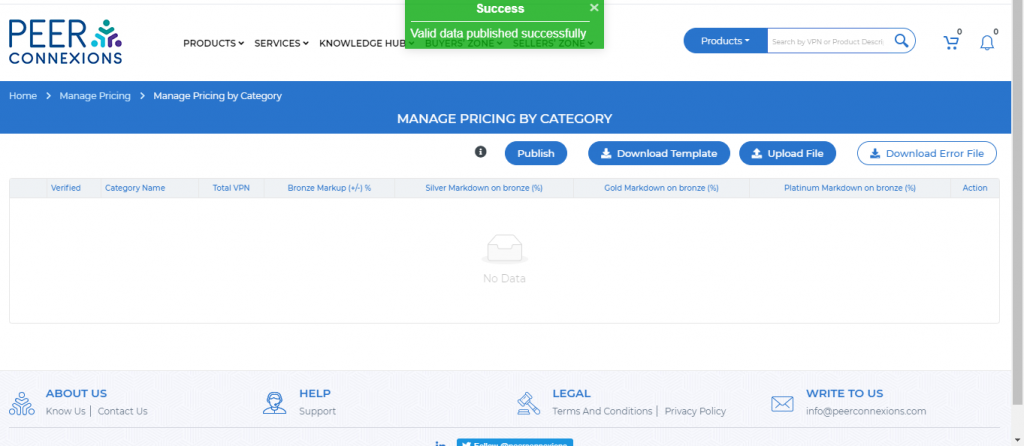
Now the pricing for the required Category will be published on the portal.
This tutorial should help you with the new features added in the pricing module and we hope that it would help in smoother processing for the same.
———————————————–Thank You—————————————————-